Select * FROM “sheet” WHERE Barcode = “235261”;
Hello all! I’m curious whether there are any settings to control iSWAP motion profiles. I’m hoping to use it to move resin plates from drain positions onto elution plates, but each transfer involves a rapid 360-degree swinging motion. I’d like to avoid cross contamination by droplets from the bottom of the plate and just have the gripper move slowly and directly over without all this swinging around. Any solutions?
@EricSindelar_Hamilton @WilliamCham_Hamilton @MarekRybka_Hamilton @NickHealy_Hamilton
I have used firmware commands to slow-down the iSWAP for the purpose of transferring cells on a plate (very sensitive!) to and from an incubator.
This looks roughly the same in Venus and PyHamilton, essentially you send FW commands to slow down the iswap, move the plate with the same command you usually use, and then send FW commands to return the iswap to normal speed. Here is some PyHamilton code that does that:
slow_iswap_command_list=[{'FirmwareCommand':'R0AA','FirmwareParameter':'wv10000'},
                         {'FirmwareCommand':'R0AA','FirmwareParameter':'wr020'},
                         {'FirmwareCommand':'R0AA','FirmwareParameter':'tv10000'},
                         {'FirmwareCommand':'R0AA','FirmwareParameter':'tr020'},
                         {'FirmwareCommand':'C0AA','FirmwareParameter':'xe1/1'},
                         {'FirmwareCommand':'R0YR','FirmwareParameter':'yv1000'},
                         {'FirmwareCommand':'PXAA','FirmwareParameter':'yr1'},
                         ]

normal_iswap_command_list=[{'FirmwareCommand':'PXAA','FirmwareParameter':'yr4'},
                         {'FirmwareCommand':'R0YR','FirmwareParameter':'yv5000'},
                         {'FirmwareCommand':'C0AA','FirmwareParameter':'xe4/1'},
                         {'FirmwareCommand':'R0AA','FirmwareParameter':'wv55000'},
                         {'FirmwareCommand':'R0AA','FirmwareParameter':'wr170'},
                         {'FirmwareCommand':'R0AA','FirmwareParameter':'tv45000'},
                         {'FirmwareCommand':'R0AA','FirmwareParameter':'tr145'},
                         ]

def firmware_command(ham_int, firmware_command_list):
    cid = ham_int.send_command(FIRMWARECOMMAND, FirmwareCommandList=firmware_command_list)
    ham_int.wait_on_response(cid, raise_first_exception=True, timeout=120)

def slow_iswap_firmware(ham_int):
    firmware_command(ham_int, slow_iswap_command_list)

def normal_iswap_firmware(ham_int):
    firmware_command(ham_int, normal_iswap_command_list)
You can just use the send firmware function with these exact strings in Venus, you don’t have to use PyHamilton here.
2 Likes
Hello @max_gildemeister,
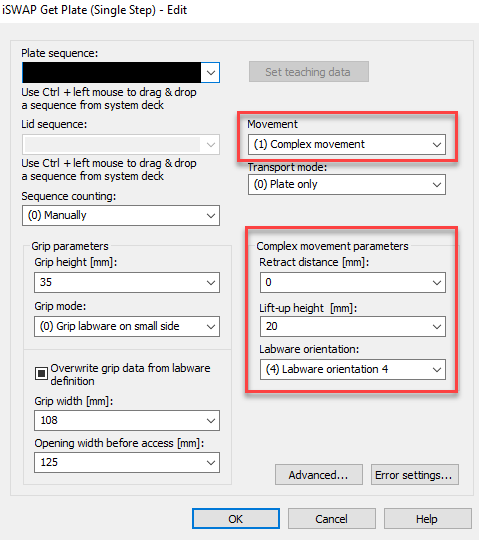
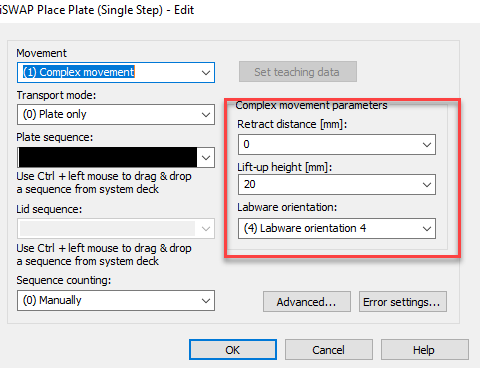
A Firmware Command can be utilized to reduce/eliminate the iSWAP “dance” but this also disables part of the collision control, so depending on the location you are moving to/from, you may crash the iSWAP. For example, in an instance where we were gripping a piece of labware from the right side and then transporting it to a device to the left side of the instrument with minimal “dance” movements, we had to use the following parameters to avoid having the iSWAP run into the back plexi:
The exact parameters you may need for this transport depend on where you are starting/ending and the orientation you want to use, so unfortunately I do not have a universal set of values for you.
The Firmware Command itself should be set right before the transport and changed back (reset) immediately after the transport. No other steps should occur in the middle of the transport.
Disable iSWAP Folding:
![]()
Now you would perform your Get Plate and Place Plate commands (Single Steps recommended - Gold/Smart Steps have not been tested by my team in this scenario).
Enable iSWAP Folding:
![]()
As with all Firmware Commands, this is a “use at your own risk” scenario and if used improperly could cause damage to the instrument, so please utilize with the utmost caution.
~William
5 Likes
@WilliamCham_Hamilton I have been wondering about the iSWAP dancing too. So your answer to max_gildemeister helped me as well. Having this forum is such a great idea! My new question is which tip or tips core head uses for liquid level detection? Have some missed wells in a run and I think that’s the cause. Thanks!
1 Like
For the CO-RE 96 Probe Head, the A1 and B2 channels are electrically connected, so whichever of those two channels connects with the fluid will trigger cLLD on that corner. The same goes for G11 and H12. So, there are cLLD signals from only 2 sources for the FW to be processed.
By default, whichever pair detects the liquid first determines the aspiration height. You can change the setting via a firmware command to be only one pair, or the other pair, or both.

Please note: channel 0 refers to A1/B2; channel 1 refers to G11/H12.
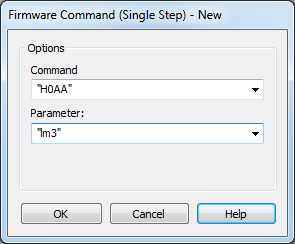
The default value for lm is 2. So if you program an aspiration with the 96 Head normally in VENUS, the cLLD is detected as soon as Channels A1/B2 or G11/H12 are in the liquid. If you want to use a different algorithm mode, you have to send a Firmware command to change the parameter lm. For example, send command “H0AA” with Parameter “lm3”. This command has to be sent within the method before the aspiration step.
This setting will be active until you send a new FW command with a different value for lm. Also, as soon as the instrument is switched off, the default value for lm will be active again (lm2).
5 Likes
Long story, short though, you need to be mindful when using cLLD and the 96 Probe Head. If the liquid in wells A1, B2, G11, or H12 are higher than the other wells, then you risk aspirating too high and not transferring liquid in the other wells.
1 Like
@EricSindelar_Hamilton Is it possible to open two .csv and perform a SQL join between the two files? Or would I need to use an excel file for this purposes? Thanks.
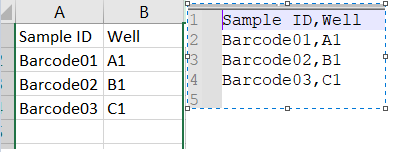
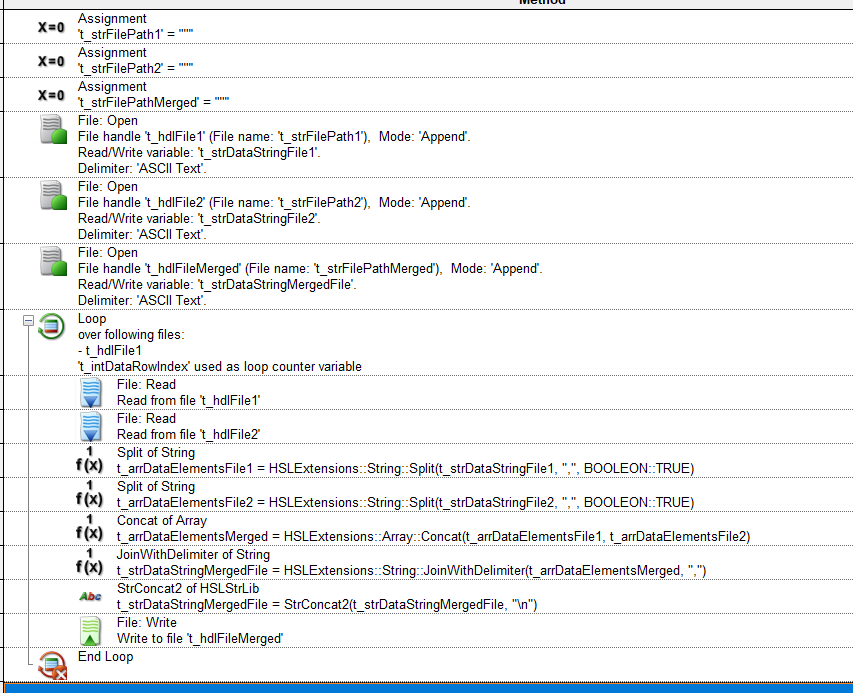
@chips-a-hoai If the intention is to merge the contents of two existing csv files into a new csv file, this can be done without a SQL command altogether. Instead, because of the simple underlying formatting of a csv file, you can use VENUS to process a csv file as an ASCII file, where it will process the raw data, per the schema of the csv file. So instead of an excel formatted table, the data fields are processed as comma delimited strings.
Here is a snip of a very simple test method that would accomplish the general approach. This will handle csv files with varied numbers of columns, without needing to redefine the table schema contents, as per typical VENUS file open commands, which must match and expected schema of headers and contents.
You would just use any preferred means of populating the variables for the various file paths with actual desired paths.
Use the general file open commands under open mode ASCII for the two files you wish to read from and merge, and the new file you want to create. Use can use Append mode for all files.

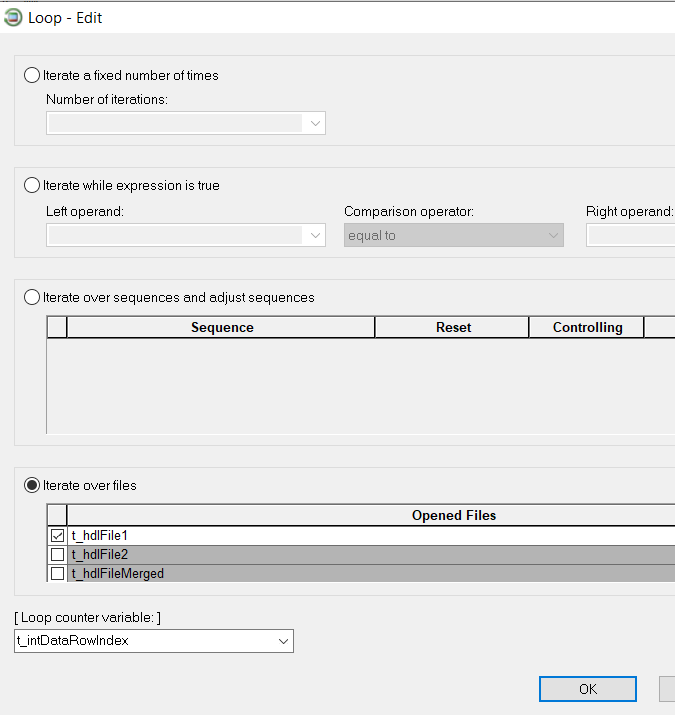
Without additional preprocessing or data criteria, this approach would generally assume that you are merging tables of equal size (rows), so loop over one of the source files.
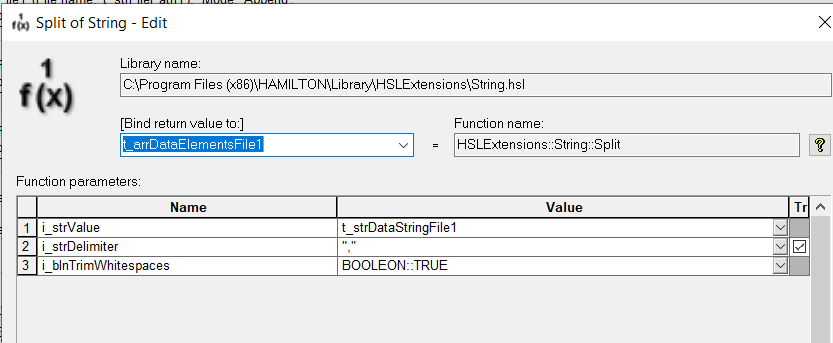
Once you have obtained your comma delimited data strings (read/write parameter from the file open command) by reading both of the source files, you can split the strings based on the comma delimiter into an array, where each element of the returned array would correspond to the data contained in the cell of the original csv. Note that this technique will force variable types for all data variable to string type, if they weren’t already. This function is found in the string library, which can be obtained by installing the HSLExtensions library linked by @EricSindelar_Hamilton in the VENUS libraries thread.
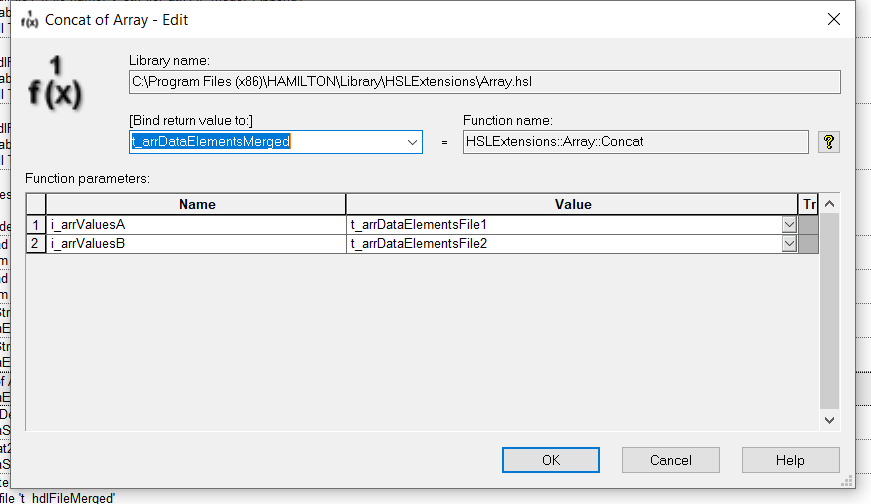
Once you have generated both arrays, you can merge them into a single array in the order of your choosing using the array concatenation function of the Array library. Again, this library will install when installing HSLExtensions.
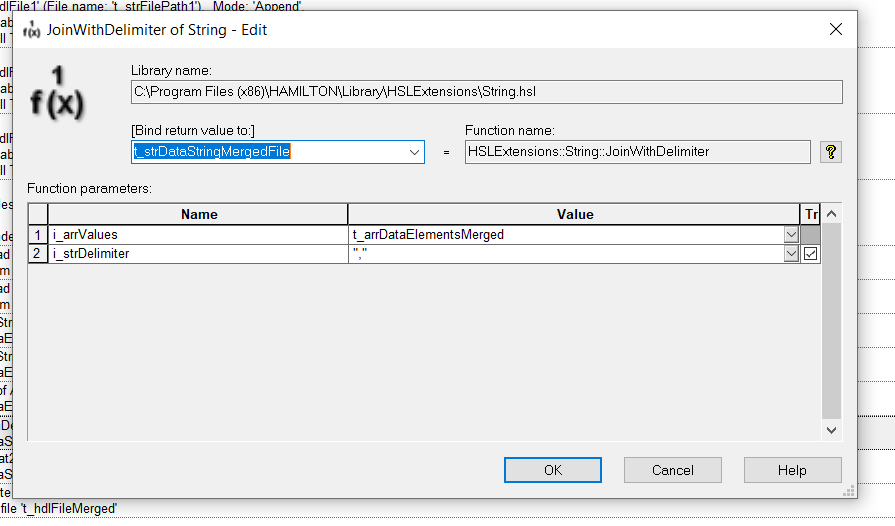
Finally you can convert this array of merges data back to a comma delimited string, using the join with delimiter function present in the string library. Return this variable as the read/write variable of your new file.
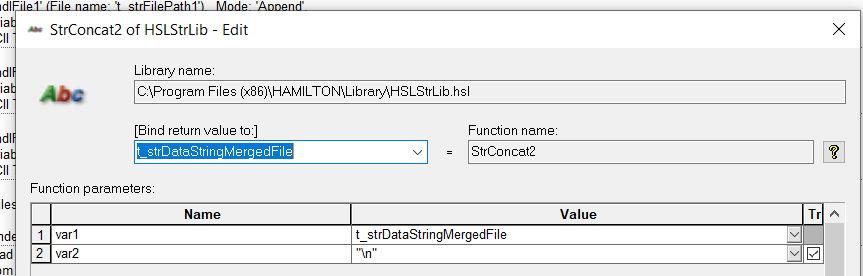
Since we are processing as ASCII, use the HSLString library (a different string processing library that installs default with VENUS) to concatenate a “\n” to your write variable, before writing your merged data to your file. This will prompt a new line for the next write event (row).
This will yield a csv merged file. Hope this helps!
5 Likes
When sending firmware commands that edit movement speed parameters it is important to note, that if the system is shut off before the parameters are switched back, the system will retain this modified value when switched back on. This is not uncommon for the Iswap to have a bad pickup for one reason or another and the user shuts off the power to avoid a crash. I’ve also seen this with people modifying the X-arm travel speed which you can imagine would also be a pretty big issue. Edit: Also note that this is only the case with “SOME” of the parameters that can be changed.
I would recommend that any method that uses these types of firmware commands also has a check on startup of the method to “verify” that the values are at the default setting and if not the function should reset them.
Hope this helps!
2 Likes
Thanks Nick.
I guess I should have clarified my question. I was looking for an option to perform a SQL INNER JOIN between two .csv files. I have have two tables with different values, however, I am only interested in grabbing data that are overlapping.
Hello @chips-a-hoai,
I have been able to use INNER JOIN for two sheets on the same Excel document, but I don’t think it’s viable for two different CSV files due to the File:Open command having to point to one single specific target File - I would have to test further to completely eliminate the possibility using more complex approaches, such as Connection Strings. You could possibly read both CSV files, write each to separate sheets of a new XLS file, then run the INNER JOIN on that Excel document. Seems a bit of a roundabout way, but it is likely the closest result to your original request.
Here is a rough example of how I achieved the use of an INNER JOIN in an Excel file (please forgive the poor programming practices, this was a quick test ![]() ):
):
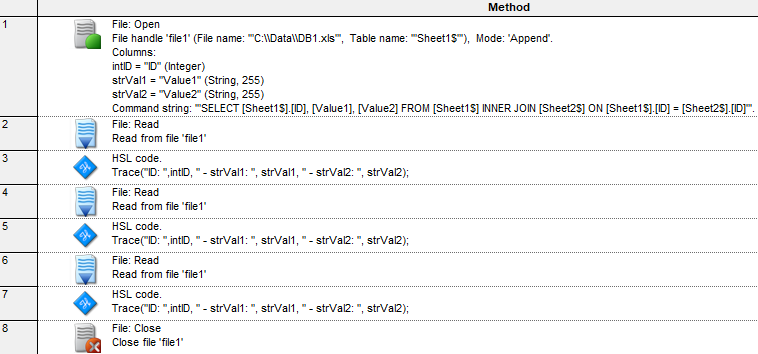
Here is the command string as text:
“SELECT [Sheet1$].[ID], [Value1], [Value2] FROM [Sheet1$] INNER JOIN [Sheet2$] ON [Sheet1$].[ID] = [Sheet2$].[ID]”
~William
2 Likes
Hi all,
Since it has been brought up for some of the questions here, I wanted to take a moment to further clarify use of FW Commands to overwrite Firmware parameters on STARline instruments. While there are a number of Firmware parameters that are saved and committed to persistent memory instead of volatile memory, most of the commands discussed in this thread will reset back to default if the instrument is power cycled and will not persist beyond power loss. This requires a complete loss of power - if the power switch is quickly flicked off and back on or you have a brief “brown-out,” that may not be enough time for the values to be cleared. Just to make sure, we tested the following commands on our end to confirm they are reset after a power cycle:
Firmware Command: R0AA, Firmware Parameter: wv
Firmware Command: R0AA, Firmware Parameter: wr
Firmware Command: R0AA, Firmware Parameter: tv
Firmware Command: R0AA, Firmware Parameter: tr
Firmware Command: R0AA, Firmware Parameter: gv
Firmware Command: R0AA, Firmware Parameter: gr
Firmware Command: R0AA, Firmware Parameter: zv
Firmware Command: R0AA, Firmware Parameter: zr
Firmware Command: C0AA, Firmware Parameter: xe
Firmware Command: R0YR, Firmware Parameter: yv
Firmware Command: PXAA, Firmware Parameter: yr
Firmware Command: PXAA, Firmware Parameter: yv
Firmware Command: PXAA, Firmware Parameter: zr
Firmware Command: PXAA, Firmware Parameter: zv
Firmware Command: H0AA, Firmware Parameter: yr
Firmware Command: H0AA, Firmware Parameter: yv
Firmware Command: H0AA, Firmware Parameter: zr
Firmware Command: H0AA, Firmware Parameter: zv
This is an incomplete list, and there are some parameters that won’t reset on a power cycle, mostly in terms of system features, such as MAD or TADM. It is best practice to reset any and all of these values back to their original values once you are done with that particular behavior in your script. Relying on a power cycle to reset those values would not be advised, however, if you do power cycle your instrument and still see some of these parameters running at a slowed/accelerated value, it might warrant taking a look through the script to make sure it isn’t accidentally setting these values somewhere unintended.
Hopefully this helps with troubleshooting efforts if you find yourself running into inexplicable persistence of parameter overwrite calls.
~William
6 Likes
Excellent clarification on the parameters! I modified my post to reflect that persistency is not an issue with every parameter.
Do you have a deeper explanation as to why some hang around and some do not? Just curious.
Most likely a design choice on the software and firmware development side. I do not have any details on the engineering involved in the implementation.
2 Likes
@WilliamCham_Hamilton @EricSindelar_Hamilton I got this error when trying to run Inheco SetTargetTemperature: The error description is: C:\Program Files (x86)\HAMILTON\Library\HSLInhecoTEC\HSLInhecoTECLib.hsl(1127) : left hand side of expression is not a number (0x23 - 0x2 - 0x4)
And this is line 1127: “o_strErrorCode = '” + o_strErrorCode + “'”
I assume HSL allows string addition because the same scripts work fine in another method. Can you help please?
Can you please provide a pkg of the method as well as a trace file from a run in which the error occurred?
Hello @Automation,
Additionally, can you please provide the version of the Inheco TEC Driver being used?
~ William
Hi @Automation,
One of our colleagues confirmed that in one of the newer Inheco TEC libraries the variable used to assign o_strErrorCode within your Method needs to be initialized as an empty string to set the data type before calling SetTargetTemperature.
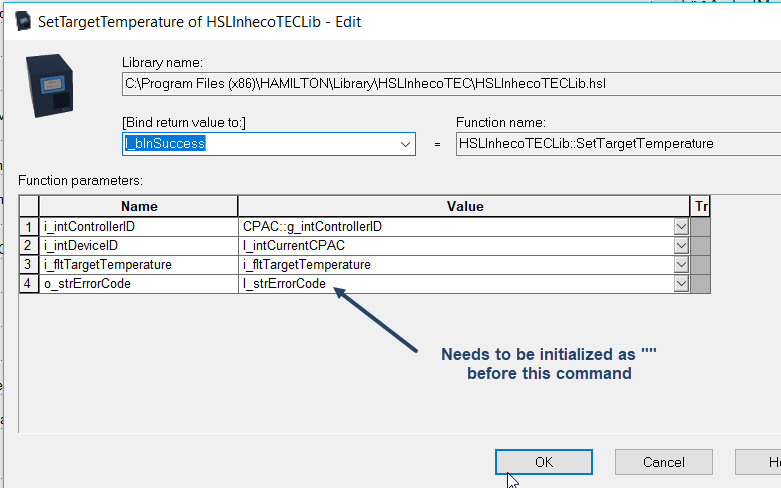
Setting your variable to “” (l_strErrorCode = “”) anywhere in your Method prior to the call would do the job.
Please let us know if you continue seeing this issue after implementing this.
~ William
3 Likes